
The Complete Guide to Excavator Bucket Capacity, Safety, and Productivity
Introduction: Why Excavator Bucket Volume Matters More Than You Think
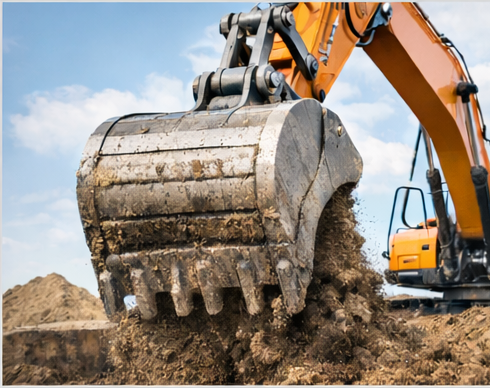
How much material can an excavator bucket really carry in one scoop? Many people assume it’s just a simple math problem—length × width × height—but in real jobsite conditions, that quick calculation can be very misleading. Choosing the wrong excavator bucket size can slow your work, waste fuel, and even put your machine and operator at risk.
Excavator bucket volume is not just a number on a spec sheet. It directly affects how fast you can finish a job, how much fuel your excavator burns, and how much stress is placed on the machine over time. If bucket capacity is miscalculated, projects can run over budget, productivity can drop, and safety issues can appear on the jobsite.
In this guide, you’ll learn:
What Is Excavator Bucket Volume?
Key Concepts: Struck, Heaped, and Actual Working Capacity
Industry Standards for Excavator Bucket Volume Measurement
Excavator Bucket Volume Calculation Basics
Step-by-Step: How to Calculate Excavator Bucket Volume
Material Density and Its Impact on Excavator Bucket Capacity
Safety First: Matching Excavator Bucket Size to Machine Capacity
Excavator Bucket Types and Their Volume Characteristics
How Excavator Bucket Teeth and Wear Affect Capacity
Excavator Bucket Volume and Productivity (m³/hr or yd⊃3;/hr)
Common Mistakes When Calculating Excavator Bucket Volume
How to Choose the Right Excavator Bucket for Your Project
What Is Excavator Bucket Volume?
Before you can calculate anything, it’s important to understand what excavator bucket volume actually means. Many people look at a bucket and guess its size by how big it appears, but in real construction work, looks can be very deceiving.
Excavator Bucket Volume Explained Simply
Excavator bucket volume refers to the amount of material the bucket can hold inside, not how large it looks from the outside.
Internal bucket volume
This is the usable space inside the bucket where soil, sand, or rock sits. This is the only volume that matters for calculations.
External bucket size
This includes the steel thickness, reinforcements, side cutters, and teeth. These parts make the bucket stronger, but they do not increase how much material it can carry.
That’s why excavator buckets are rated by volume (m³, yd⊃3;, or ft⊃3;) instead of by width or appearance. Two buckets may look similar from the outside, but their internal shapes can be very different.
Simple example:
A heavy-duty rock bucket often looks bigger than a general-purpose bucket, but because of thick wear plates and reinforcements, it may actually hold less material inside.
Excavator Bucket Volume vs Excavator Bucket Capacity
These two terms are often used together, but they are not exactly the same.
Excavator bucket volume (rated or theoretical capacity)
This is the volume calculated or stated by the manufacturer, usually based on industry standards. It assumes ideal conditions.
Actual working capacity
This is how much material the bucket really carries during daily work. It depends on material type, moisture, operator skill, and machine limits.
This is why two excavator buckets with the same rated volume can perform very differently on the jobsite.
| Factor | How It Affects Performance |
| Bucket shape | Curved backs and tapered sides reduce usable space |
| Material type | Rock fills less efficiently than sand or soil |
| Fill factor | Buckets are rarely filled to 100% every cycle |
| Machine power | Limited hydraulics may prevent full loading |
| Operator skill | Experienced operators achieve higher fill rates |
In short, excavator bucket volume tells you the potential, while actual capacity shows you what really happens in the field. Understanding this difference helps avoid overloading the machine, improves productivity, and leads to better bucket selection decisions.
Key Concepts: Struck, Heaped, and Actual Working Capacity
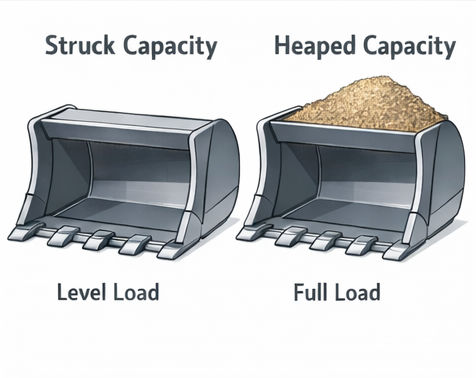
Struck Excavator Bucket Capacity
Definition: material level with the bucket rim
When struck capacity is used
Why it provides conservative estimates
Heaped Excavator Bucket Capacity
Definition: material piled above the bucket rim
Angle of repose explained (1:1 vs 1:2)
Typical increase over struck capacity (10–25%)
When heaped capacity matters in real jobs
Fill Factor Explained for Excavator Buckets
What fill factor represents in real-world conditions
How operator skill affects fill factor
Typical fill factor ranges by material:
Industry Standards for Excavator Bucket Volume Measurement
When you look at excavator bucket specifications, you’ll often see a volume number—but that number only makes sense if you know which standard was used. Different standards measure bucket volume in different ways, which is why two buckets with the same “size” can appear very different on paper.
SAE Excavator Bucket Capacity Standard (SAE J296)
The SAE J296 standard is one of the most widely used bucket volume standards in the world.
Uses a 1:1 angle of repose
Material is piled above the bucket edge at a 45-degree slope
Commonly used in North America and many global markets
Often referenced by major excavator and bucket manufacturers
Because the heap is moderate, SAE-rated excavator bucket volumes are usually seen as a balanced and realistic representation of working capacity.
ISO Excavator Bucket Volume Standards
ISO standards are designed to create consistency across international markets.
Used for earth-moving machinery worldwide
Measurement methods are very similar to SAE
In many cases, ISO and SAE bucket volumes are nearly the same
For practical purposes, ISO-rated excavator bucket volume can usually be compared directly with SAE values, but it’s still important to confirm which standard is listed on the spec sheet.
CECE Excavator Bucket Capacity Standard
The CECE standard is commonly used in Europe and follows a different approach.
Uses a 1:2 angle of repose
Material is piled higher and steeper above the bucket
Results in a larger rated bucket volume
This is why CECE-rated excavator buckets often look bigger on paper—even though the physical bucket may be the same.
| Standard | Heap Shape | Typical Region | Rated Volume Appearance |
| SAE J296 | 1:1 slope | North America / Global | Moderate |
| ISO | Similar to SAE | International | Moderate |
| CECE | 1:2 slope | Europe | Larger |
Why Bucket Capacity Standards Matter
Understanding these standards helps you avoid costly mistakes when choosing or comparing excavator buckets.
Avoid misleading comparisons
A 1.0 m³ CECE-rated bucket may hold less material in real work than a 1.0 m³ SAE-rated bucket.
Confirm which standard is used
Check the manufacturer’s datasheet, product description, or technical drawings for references to SAE, ISO, or CECE.
Compare excavator buckets “apples to apples”
Always compare buckets measured under the same standard, especially when sourcing buckets from different regions or suppliers.
Knowing the standard behind the number gives you a clearer picture of what an excavator bucket can really do on the jobsite.
Excavator Bucket Volume Calculation Basics
Before jumping into formulas, it helps to understand the basic measurements and units used to calculate excavator bucket volume. Once these fundamentals are clear, the actual math becomes much easier and far more accurate.
Key Dimensions Required to Measure an Excavator Bucket
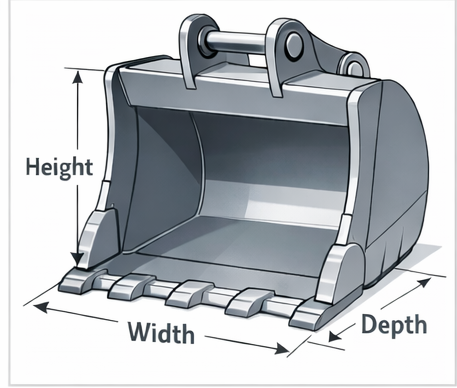
Excavator bucket volume is based on internal dimensions, not the outside size of the bucket. These three measurements form the foundation of every calculation:
Internal width
Measured from the inside of one side wall to the inside of the other. This is the working width that holds material.
Internal height
Measured from the inside bucket floor up to the bucket edge. This determines how deep material can stack inside.
Average internal depth (length)
Measured from the cutting edge back to the inside rear wall. Because most buckets are curved, this is often an average, not a single straight line.
For tapered excavator buckets, it’s best to take multiple measurements and use an average. This helps avoid overestimating volume.
Internal Dimensions vs External Measurements
One of the most common mistakes is measuring the outside of the bucket.
External measurements include steel thickness, reinforcements, and wear plates
These features add strength but do not increase usable volume
Using external dimensions can overstate bucket volume by 10–15%
Always measure the space where material actually sits.
Units Used in Excavator Bucket Volume
Excavator bucket volume is expressed in different units depending on region and market.
Cubic meters (m³) – Common in Europe and international markets
Cubic yards (yd⊃3;) – Widely used in North America
Cubic feet (ft⊃3;) – Often used for smaller buckets and mini excavators
| Unit | Common Use |
| m³ | Medium to large excavators |
| yd⊃3; | Construction and rental markets |
| ft⊃3; | Mini excavators and trenching buckets |
Basic Volume Formula Explained
At its core, excavator bucket volume starts with a simple formula:
Volume = Length × Width × Height
This calculation gives you the struck bucket volume, assuming the bucket is perfectly rectangular. In reality, excavator buckets have curved backs and sloped sides, which is why correction factors are applied in later steps.
Think of this formula as the starting point—it gives you a baseline that can then be adjusted to better match real-world conditions.
Step-by-Step: How to Calculate Excavator Bucket Volume
Calculating excavator bucket volume doesn’t require advanced math, but it does require doing things in the right order. Follow these steps carefully, and you’ll get a number that actually makes sense on a real jobsite.
Step 1: Measure Internal Bucket Dimensions Correctly
Always measure inside the bucket, where the material sits.
Where to measure:
Width: Inside distance between the two side walls
Height: From the inside bucket floor up to the top edge
Depth (length): From the inside of the cutting edge to the inside rear wall
Measuring tools and tips:
Use a tape measure for small and mid-size buckets
A laser measurer works well for large excavator buckets
Clean out dirt and debris before measuring
Take measurements in more than one spot and use the average
Common mistakes to avoid:
Measuring the outside of the bucket
Ignoring bucket taper or curved backs
Forgetting to keep all measurements in the same unit
Step 2: Calculate Struck Excavator Bucket Volume
Once you have the internal measurements, use the basic formula:
Struck Volume = Length × Width × Height
This calculation assumes the bucket is filled level with the rim, with no material piled on top.
Why internal dimensions matter:
External measurements include steel thickness and reinforcements
These do not add usable volume
Using outside dimensions can overestimate capacity by 10–15%
Worked example:
Length: 1.2 m
Width: 1.0 m
Height: 0.9 m
Struck Volume = 1.2 × 1.0 × 0.9 = 1.08 m³
Step 3: Apply Shape Correction Factor
Excavator buckets are not perfect boxes. Most have:
To correct for this, apply a shape factor.
| Bucket Type | Typical Shape Factor |
| General-purpose bucket | ~0.80 |
| Heavy-duty or rock bucket | 0.75–0.78 |
| Shallow grading bucket | 0.80–0.85 |
Adjusted Struck Volume = Struck Volume × Shape Factor
Using the example above:
1.08 × 0.8 = 0.86 m³
This adjusted number is much closer to real bucket capacity.
Step 4: Calculate Heaped Excavator Bucket Volume
If you need the heaped capacity, apply a heap factor to the adjusted struck volume.
Typical heap factor range: 1.1–1.3
Depends on material type and measurement standard (SAE, ISO, CECE)
| Heap Factor | Typical Use |
| 1.1 | Conservative estimate |
| 1.2 | Common SAE/ISO reference |
| 1.3 | CECE or steep heap rating |
Heaped Volume = Adjusted Struck Volume × Heap Factor
Example:
0.86 × 1.2 = 1.03 m³ (heaped)
Step 5: Convert Excavator Bucket Volume Between Units
Bucket volume may need to be converted depending on your region or project.
Common conversions:
Cubic inches → cubic feet: ÷ 1,728
Cubic feet → cubic yards: ÷ 27
Cubic meters → cubic yards: × 1.308
Cubic yards → cubic meters: ÷ 1.308
| Unit | Best Used For |
| ft⊃3; | Mini excavators |
| yd⊃3; | North American projects |
| m³ | International projects |
Keeping units consistent throughout the calculation helps prevent costly errors and confusion.
Excavator Bucket Volume Calculation Examples
Real numbers make excavator bucket volume much easier to understand. The examples below show how the same calculation method works for different machines, bucket types, and materials you’ll see on real jobsites.
Example 1: GP Excavator Bucket for a 20-Ton Machine
Scenario:
A 20-ton excavator is equipped with a general-purpose (GP) bucket for earthmoving.
Measured internal dimensions:
Length: 1.2 m
Width: 1.0 m
Height: 0.9 m
Step 1: Calculate basic (struck) volume
Struck Volume = 1.2 × 1.0 × 0.9 = 1.08 m³
Step 2: Apply shape factor (0.8 for GP bucket)
Adjusted Struck Volume = 1.08 × 0.8 = 0.86 m³
Step 3: Calculate heaped capacity (heap factor 1.2)
Heaped Volume = 0.86 × 1.2 = 1.03 m³
Performance with different materials:
| Material | Fill Factor | Actual Working Volume |
| Loose soil | 1.00 | 0.86 m³ |
| Clay | 0.90 | 0.77 m³ |
| Gravel | 0.95 | 0.82 m³ |
| Blasted rock | 0.70 | 0.60 m³ |
Even though the bucket is rated at over 1.0 m³ heaped, the real working volume changes clearly with material type.
Example 2: Mini Excavator Bucket Volume Calculation
Scenario:
A 6-ton mini excavator is using an 18-inch trenching bucket for utility work.
Measured internal dimensions (imperial):
Length: 24 in
Width: 18 in
Height: 20 in
Step 1: Calculate volume in cubic inches
24 × 18 × 20 = 8,640 in⊃3;
Step 2: Convert to cubic feet
8,640 ÷ 1,728 = 5.0 ft⊃3;
Step 3: Convert to cubic yards
5.0 ÷ 27 = 0.19 yd⊃3;
Typical trenching use case:
For trenching work, accuracy and control matter more than raw bucket volume.
Example 3: Rock Bucket Capacity Verification
Scenario:
A 30-ton excavator is fitted with a heavy-duty rock bucket working in blasted rock.
Given:
Step 1: Calculate actual load weight
Load = 1.2 × 2,000 × 0.75 = 1,800 kg
Step 2: Check lift capacity
Total lift weight: 1,800 + 300 = 2,100 kg
Lift ratio: 2,100 ÷ 2,200 = 0.95
| Item | Value |
| Actual load | 1,800 kg |
| Attachment weight | 300 kg |
| Total lift | 2,100 kg |
| Lift ratio | 0.95 (Safe) |
This check confirms the bucket size is safe for the machine, even though the material is heavy and abrasive.
Material Density and Its Impact on Excavator Bucket Capacity
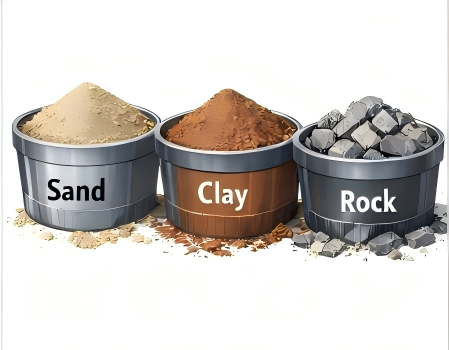
Bucket volume tells you how much space a bucket has, but material density tells you how heavy that load will be. Two buckets filled to the same level can put very different loads on an excavator depending on what material is inside.
Common Material Density Reference Table
Material density is usually measured in kg/m³ (or lb/yd⊃3;). Heavier materials place more stress on the excavator, even when bucket volume stays the same.
| Material Type | Typical Density Range |
| Light materials |
|
| Topsoil (loose) | 1,200–1,400 kg/m³ |
| Mulch / organic material | 700–1,000 kg/m³ |
| Medium materials |
|
| Dry sand | 1,400–1,600 kg/m³ |
| Gravel | 1,500–1,700 kg/m³ |
| Clay (dry) | ~1,600 kg/m³ |
| Heavy materials |
|
| Wet soil | 1,800–2,000 kg/m³ |
| Blasted rock | 1,600–2,400 kg/m³ |
| Solid rock | 2,400–3,000 kg/m³ |
Even a small change in moisture can push a material from “medium” into the “heavy” category.
How Material Density Affects Bucket Selection
To understand how density affects bucket choice, you need one simple formula:
Load Weight = Bucket Volume × Material Density × Fill Factor
This calculation shows the actual weight the excavator must lift.
Why dense materials require smaller buckets:
Heavy materials reach machine lift limits faster
Oversized buckets can slow hydraulic response
High loads increase wear on pins, bushings, and cylinders
Real-world overload example:
1.0 m³ bucket filled with dry sand
→ ~1,500 kg load
Same 1.0 m³ bucket filled with wet clay
→ ~1,900 kg load
That extra 400 kg can push the excavator beyond its safe working limit, even though the bucket volume did not change.
Loose, Bank, and Compacted Volume Explained
Material volume changes as soon as it is excavated, and this directly affects how excavator bucket capacity should be interpreted.
Bank volume
Material in its natural, undisturbed state in the ground.
Loose volume
Material after excavation. Air spaces increase volume.
Compacted volume
Material after placement and compaction.
Excavator buckets always measure loose volume, not bank volume.
| Material | Typical Swell Factor |
| Sand | 1.10–1.15 |
| Clay | 1.25–1.40 |
| Rock | 1.40–1.70 |
How this affects bucket calculations:
A bucket rated at 1.0 m³ loose volume may represent only 0.7–0.8 m³ of bank material
Higher swell factors mean fewer bank cubic meters moved per bucket cycle
Understanding swell helps convert bucket volume into accurate production estimates
Safety First: Matching Excavator Bucket Size to Machine Capacity
Choosing the biggest excavator bucket is not always the best idea. Bucket size must match what the machine can safely lift and control. Ignoring this can lead to slow performance, higher fuel costs, and serious safety risks on the jobsite.
Understanding Excavator Lift Capacity
Every excavator has a rated lift capacity set by the manufacturer. This tells you how much weight the machine can safely lift under specific conditions.
How to read OEM lift charts:
Lift charts are found in the operator’s manual or manufacturer specs
Capacity changes depending on boom length, stick position, and working radius
Lifting close to the machine is safer than lifting far away
Effect of boom position and reach:
Extended boom or stick = lower lift capacity
Lifting over the side is usually more limiting than lifting over the front
Higher lift heights reduce stability
Impact of quick couplers and attachments:
Quick couplers add extra weight
Thumbs, buckets, and other tools all reduce available lift capacity
This extra weight must be included in all calculations
Calculating Lift Ratio for Safe Operation
The lift ratio helps you quickly check if a bucket and load are safe for your excavator.
Step-by-step lift ratio calculation:
Find the excavator’s rated lift capacity from the lift chart
Subtract the weight of:
Empty bucket
Quick coupler
Any other attachments
Calculate the material load weight
Add attachment weight to the material load
Divide total load by rated lift capacity
Lift Ratio = Total Load ÷ Rated Lift Capacity
| Lift Ratio | Meaning |
| < 0.85 | Safe and efficient |
| 0.85–1.0 | Near limit, use caution |
| > 1.0 | Unsafe operation |
Keeping the lift ratio below 1.0 helps protect the machine and the operator.
Warning Signs Your Excavator Bucket Is Too Large
Even without calculations, machines often show clear signs when a bucket is oversized.
Slow hydraulics and poor cycle times
The machine struggles to curl or lift the bucket smoothly.
Excessive fuel use
Engines work harder to move heavy loads.
Machine instability
Tracks may lift slightly, or the machine feels unbalanced.
Accelerated wear on pins and bushings
Extra stress shortens component life and increases maintenance costs.
These warning signs usually mean it’s time to reduce bucket size or switch to a lighter configuration.
Excavator Bucket Types and Their Volume Characteristics

Not all excavator buckets are designed to carry the same amount of material. Bucket shape, width, and reinforcement level all affect how much material a bucket can actually hold. Understanding these differences makes it much easier to choose the right bucket for the job.
General Purpose (GP) Excavator Buckets
General-purpose buckets are the most commonly used excavator buckets on construction sites.
Typical volume ranges by excavator size:
| Excavator Size | Typical GP Bucket Volume |
| Mini (1–6 tons) | 0.03–0.30 m³ |
| Small (6–15 tons) | 0.30–0.80 m³ |
| Medium (15–30 tons) | 0.80–1.80 m³ |
| Large (30+ tons) | 1.80–5.00 m³ |
Best-use applications:
General earthmoving
Loading soil, sand, and gravel
Light demolition and site prep
GP buckets offer a good balance between volume, strength, and digging efficiency.
Heavy-Duty Rock Buckets
Rock buckets are built for tough conditions and abrasive materials.
Reinforced wear plates and side walls
Heavier steel and stronger teeth
Smaller internal volume due to reinforcement
Common applications:
Even if a rock bucket looks large, its usable volume is often 15–30% less than a GP bucket of similar width.
Trenching Excavator Buckets
Trenching buckets are designed for accuracy, not capacity.
Narrow profiles for clean, precise trenches
Used for utilities, pipelines, and drainage
Typical widths:
With trenching buckets, width matters more than volume, since the goal is to dig to a specific trench size with minimal cleanup.
Grading and Ditching Buckets
Grading and ditching buckets are wide and shallow.
Designed to move material over a large surface area
Lower volume compared to GP buckets
Often toothless or fitted with a smooth cutting edge
Best uses:
Slope finishing
Ditch cleaning
Backfilling and leveling
These buckets trade raw capacity for smoother, more controlled results.
Skeleton / Sieve Excavator Buckets
Skeleton buckets are built for sorting rather than carrying full loads.
Volume considerations:
Rated volume may look high on paper
Effective volume depends on grid spacing
Not intended for carrying dense, full loads
They are commonly used in recycling, demolition cleanup, and material separation.
Tilting Excavator Buckets
Tilting buckets add extra movement for precision work.
How tilt affects capacity:
Maximum volume is reduced when tilted
Material may spill at higher angles
Best used for light to medium materials
Tilting excavator buckets are popular for grading, slope work, and landscaping where control matters more than raw bucket volume.
How Excavator Bucket Teeth and Wear Affect Capacity
Excavator bucket volume isn’t fixed for the life of the bucket. Teeth style and normal wear both play a big role in how much material the bucket can actually pick up on each pass.
Bucket Teeth Configuration and Fill Efficiency
Bucket teeth affect how well the bucket cuts into material and fills. The wrong teeth can leave space inside the bucket, even if the rated volume looks correct.
| Tooth Type | Best Use | Effect on Fill |
| Standard teeth | Soil, sand, mixed material | Balanced penetration and fill |
| Tiger teeth | Rock, compacted ground | Strong penetration, lower fill |
| Chisel teeth | Hard clay, frost | Clean cutting, moderate fill |
Standard teeth
These are the most common and provide good penetration without reducing fill too much.
Tiger teeth
Designed to break hard material. They penetrate well but often reduce fill efficiency because material does not pack evenly.
Chisel teeth
Cut clean lines in hard soil and clay, offering a middle ground between penetration and fill.
Toothless cutting edges for grading:
Smooth edge allows material to flow evenly into the bucket
Higher fill factor for loose materials
Common on grading and ditching buckets
The right teeth choice can improve fill factor by 5–15%, even with the same bucket volume.
How Bucket Wear Reduces Effective Volume
Over time, wear changes the shape of the bucket and reduces how much material it can hold.
Common wear areas:
Worn teeth reduce digging efficiency and leave empty space
Rounded cutting edges prevent clean entry into material
Side wall and floor wear reduce internal dimensions
| Wear Area | Effect on Capacity |
| Teeth wear | Lower fill factor |
| Cutting edge scalloping | Material spills sooner |
| Floor wear | Reduced internal height |
| Side wall wear | Loss of usable width |
When to recalculate bucket volume:
After 500–1000 operating hours
After replacing cutting edges or side cutters
When switching between worn and new teeth
As buckets wear, the rated volume stays the same—but the effective working volume keeps shrinking, which is why periodic checks are important.
Excavator Bucket Volume and Productivity (m³/hr or yd⊃3;/hr)
Excavator bucket volume is only part of the productivity story. What really matters on the jobsite is how much material you can move per hour, not just how much fits in the bucket once.
How Bucket Volume Translates into Production Rate
To estimate real production, you need three key numbers:
Production = Bucket Volume × Fill Factor × Cycles per Hour
Bucket Volume: The adjusted working volume, not just the rated number
Fill Factor: How full the bucket gets in real conditions
Cycles per Hour: How many complete dig–swing–dump–return cycles the excavator can make
Why cycle time matters more than bucket size:
Larger buckets take longer to fill
Heavier loads slow swing and dump speeds
Operators often reduce speed to stay safe
Faster cycles can outweigh smaller bucket size
Even a small increase in cycle time can reduce hourly output more than people expect.
Productivity Comparison Example
Let’s compare two buckets on the same excavator.
| Factor | Large Bucket | Smaller Bucket |
| Bucket volume | 1.2 m³ | 0.9 m³ |
| Fill factor | 0.85 | 0.95 |
| Cycle time | 30 sec | 22 sec |
| Cycles per hour | 120 | 164 |
Production calculation:
Even though the smaller bucket holds less material per scoop, it moves more material per hour because the excavator cycles faster and fills more efficiently.
This is why choosing the right excavator bucket is about balancing volume, fill factor, and cycle time—not just picking the biggest option available.
Specialized Excavator Bucket Applications
Some jobs push excavators far outside normal digging conditions. In these cases, standard bucket volume rules need to be adjusted to keep the machine safe, stable, and productive.
Amphibious Excavator Bucket Sizing
Amphibious excavators work in wetlands, marshes, and soft ground, where stability is limited and material is usually saturated.
Key challenges:
Soft ground offers little support
Wet material is much heavier than dry soil
Sudden load shifts can reduce stability
Recommended bucket size adjustments:
Reduce bucket volume by 20–30% compared to standard land work
Favor wide, shallow buckets to lower ground pressure
Use smoother cutting edges to reduce suction in mud
| Condition | Recommended Adjustment |
| Saturated soil | −20% bucket volume |
| Soft organic ground | −25% to −30% |
| Deep mud | Use shallow grading bucket |
Dredging Excavator Bucket Volume Considerations
Dredging involves moving material that is fully or partially underwater, which changes both weight and handling.
Important factors:
Water-saturated material is significantly heavier
Fine sediments create suction when lifted
Buckets may not drain fully before lifting
Typical density considerations:
Saturated sand: ~2,000 kg/m³
Saturated silt or clay: 1,800–2,100 kg/m³
Stability considerations on floating platforms:
Smaller bucket volumes improve control
Slower lift speeds reduce load swing
Drain holes help reduce carried water weight
Using a slightly smaller bucket often improves overall dredging productivity by reducing instability.
High-Reach Demolition Excavator Buckets
High-reach demolition excavators operate with long booms and heavy tools at height, where leverage greatly reduces lift capacity.
Why smaller buckets are safer:
Extended reach lowers rated lift capacity
Small weight increases have large effects at height
Falling debris increases impact risk
Capacity reduction recommendations:
Reduce bucket volume by 30–40% compared to standard digging
Use reinforced buckets with lower rated capacity
Prioritize control over maximum material load
| Application | Typical Volume Reduction |
| Standard demolition | −25% |
| High-reach demolition | −30% to −40% |
| Precision removal | Smaller bucket preferred |
In high-reach work, control and safety matter far more than raw bucket volume.
Tools and Resources for Excavator Bucket Calculations
You don’t always have to start from zero when calculating excavator bucket volume. There are several tools and resources that can help—if you know how to use them correctly.
OEM Excavator Bucket Capacity Charts
Most bucket manufacturers publish capacity charts for their excavator buckets.
How to read manufacturer specs:
Look for bucket volume listed in m³, yd⊃3;, or ft⊃3;
Check which standard is used (SAE, ISO, or CECE)
Confirm whether the number is struck or heaped capacity
Why OEM ratings may differ from field measurements:
Ratings are based on new buckets with no wear
Assumptions are made about heap shape and fill
Teeth, couplers, and wear plates may not be included
OEM charts are a great starting point, but they don’t always reflect real jobsite conditions.
OEM Rated Volume vs Field-Measured Volume
It’s common to see a difference between rated bucket volume and what you measure in the field.
| Comparison | Typical Difference |
| New bucket, light material | ±5% |
| Worn bucket or heavy material | ±5–10% |
| Different measurement standards | 10% or more |
Common causes of discrepancies:
Bucket wear on the floor and side walls
Different heap standards (SAE vs CECE)
Shape correction factors not applied
Added attachments changing internal space
Small differences are normal, but large gaps are a sign something needs to be checked.
Online Calculators and Mobile Apps
Online tools and apps can be helpful for quick estimates.
When digital tools are useful:
Why manual verification still matters:
Apps assume ideal bucket shapes
Material density and fill factor may be guessed
Wear, teeth, and attachments are often ignored
Digital tools work best when paired with real measurements and jobsite experience.
When to Consult Excavator Bucket Specialists
Some situations call for expert help.
You may need a specialist when:
Buckets are custom-built or heavily modified
Projects involve very dense or abrasive materials
Lift limits are tight and safety margins are small
The project value or risk is high
Specialists can review calculations, recommend the right bucket design, and help avoid expensive mistakes before work begins.
Common Mistakes When Calculating Excavator Bucket Volume
Even with the right formulas, excavator bucket volume is easy to get wrong. Many problems on the jobsite come from small mistakes that add up quickly.
Measuring External Instead of Internal Dimensions
One of the most common errors is measuring the outside of the bucket.
External measurements include steel thickness and wear plates
These do not add usable space
This mistake can overestimate bucket volume by 10–15%
Always measure where the material actually sits—inside the bucket.
Ignoring Material Density
Bucket volume alone does not tell you how heavy the load will be.
Light soil and wet clay can have very different weights
Dense material reaches lift limits much faster
Ignoring density can cause overload and instability
| Material | Approx. Density |
| Dry sand | ~1,500 kg/m³ |
| Wet clay | ~1,900 kg/m³ |
| Blasted rock | ~2,000+ kg/m³ |
The same bucket volume can be safe with one material and dangerous with another.
Confusing Struck and Heaped Capacity
Struck and heaped capacity are not interchangeable.
Using heaped capacity for production planning often leads to overestimating output.
Forgetting Attachment Weight
Attachments reduce how much material an excavator can lift.
Quick couplers
Thumbs
Wear packages
These items add weight before any material is lifted and must be included in lift calculations.
Believing “Bigger Is Always Better”
A larger bucket does not always mean more work done.
In many cases, a slightly smaller bucket moves more material per hour and keeps the excavator working smoothly.
Excavator Bucket Volume FAQ
Q: What is the difference between struck and heaped capacity?
A: Struck capacity is the bucket volume when material is filled level with the bucket’s edge. Heaped capacity includes material piled above the edge, usually shaped by an assumed slope (angle of repose). Struck capacity is more conservative and realistic for planning, while heaped capacity is often used in manufacturer ratings and comparisons.
Q: How often should excavator bucket volume be recalculated?
A: Excavator bucket volume should be recalculated every 500–1,000 operating hours, or whenever there is noticeable wear on the bucket floor, side walls, cutting edge, or teeth. Volume should also be checked after replacing teeth, side cutters, or switching to a different bucket configuration.
Q: Can wet soil change bucket capacity?
A: Yes. Wet soil is much heavier than dry soil and often sticks inside the bucket, reducing fill efficiency. Even though the bucket volume stays the same, actual working capacity decreases, and lift limits may be reached faster. Wet clay and saturated soil often require smaller bucket sizes.
Q: Can I use a larger excavator bucket to finish faster?
A: Not always. A larger bucket may increase cycle time, reduce fill factor, and strain the hydraulics. In many cases, a slightly smaller bucket with faster cycles moves more material per hour and is safer for the machine.
Q: What is the most common excavator bucket size for mid-size machines?
A: For 20–30 ton excavators, the most common bucket size is typically 0.8–1.5 m³ (about 1.0–2.0 yd⊃3;), depending on material type and application.
Q: What is the bucket capacity of an excavator?
A: Excavator bucket capacity varies widely by machine size and bucket type.
Mini excavators: ~0.03–0.30 m³
Mid-size excavators: ~0.5–2.0 m³
Large excavators: 2.0 m³ and above
The exact capacity depends on bucket design, material density, and machine limits.
Q: How do you calculate the volume of an excavator bucket?
A: Bucket volume is calculated using internal dimensions: Volume = Length × Width × Height After that, a shape factor (usually 0.75–0.85) is applied to account for curved bucket shapes. Heaped and fill factors may be added depending on how the bucket is used.
Q: How many cubic yards is an excavator bucket?
A: Excavator buckets typically range from 0.1 to 5.0 cubic yards, depending on the machine size. For example, a 20-ton excavator commonly uses a bucket around 1.0–1.5 cubic yards.
Q: What size bucket is a 20-ton excavator?
A: A 20-ton excavator usually uses a bucket between 0.8 and 1.2 m³, which is roughly 1.0–1.6 cubic yards, depending on material and job conditions.
Q: What is the bucket capacity of a 30-ton excavator?
A: A 30-ton excavator typically uses a bucket around 1.5–2.2 m³ (about 2.0–2.9 cubic yards), with smaller buckets used for rock or heavy materials.
Q: How are excavator buckets measured?
A: Excavator buckets are measured by internal width, internal height, and internal depth. External measurements are not used because they include steel thickness and do not represent usable volume.
Q: How do I convert m³ to yd⊃3; for bucket capacity?
A: Use this simple conversion: 1 cubic meter (m³) = 1.308 cubic yards (yd⊃3;) To convert m³ to yd⊃3;, multiply by 1.308. To convert yd⊃3; to m³, divide by 1.308.
Q: How many yards is a 48-inch excavator bucket?
A: A 48-inch excavator bucket typically holds around 0.8–1.2 cubic yards, depending on bucket depth, height, and shape. Width alone is not enough to determine exact volume.
Q: How do you calculate the cubic capacity of a bucket?
A: Cubic capacity is calculated using internal dimensions: Cubic Capacity = Length × Width × Height × Shape Factor This gives a realistic struck capacity. Heaped and fill factors may then be applied.
Q: How many m³ are in an excavator bucket?
A: Excavator buckets range from less than 0.1 m³ for small mini excavators to over 5.0 m³ for large mining excavators. Most construction excavators use buckets between 0.5 and 2.0 m³.
Q: How do you measure the size of an excavator bucket?
A: Measure the internal width, internal height, and internal depth using a tape or laser measure. Always measure inside the bucket and take multiple measurements if the bucket is tapered or curved.
Q: How big is a 10-ton excavator?
A: A 10-ton excavator is considered a small to mid-size machine and typically uses a bucket around 0.3–0.6 m³, depending on application and material.
Conclusion: Choosing the Right Excavator Bucket Volume for Your Project
Getting excavator bucket volume right isn’t about chasing the biggest number on a spec sheet. It’s about choosing a bucket that works safely, efficiently, and consistently in real jobsite conditions.
Key Takeaways
Measure internal dimensions accurately
Always measure inside the bucket, where the material actually sits.
Apply shape, fill, and heap factors
Real buckets are curved, materials don’t always fill perfectly, and heaped ratings depend on standards.
Always consider material density and lift capacity
Volume tells you space; density tells you weight—and weight affects safety.
Match bucket type and size to the application
Rock, trenching, grading, and GP work all need different bucket designs and volumes.
Final Excavator Bucket Selection Checklist
Use this quick checklist before committing to a bucket:
Machine tonnage verified
Material density confirmed
Lift ratio calculated and within safe limits
Bucket type matched to the job
Attachments and couplers included in weight calculations
Operator skill and experience considered
If you can check all these boxes, you’re much less likely to run into performance or safety problems.
When to Seek Professional Guidance
Sometimes it makes sense to bring in an expert instead of guessing.
Complex materials such as wet clay, blasted rock, or mixed debris
Specialized applications like dredging, demolition, or amphibious work
Custom excavator bucket design where standard ratings don’t apply
A short consultation can prevent costly mistakes and help you get the most out of your excavator and bucket setup.


